
LEARN THE BASICS OF NATURE PHOTOGRAPHY FIRST
We all love photography. If you’re here, you must love nature too. There are many different types of photography (fashion, event, wedding, product, etc.), but the one that has drawn many of us in over the years is nature photography. Nature photography has so many facets to it. The world is literally your playground. Many of us have found nature photography to be a great travel companion. We capture memories of beautiful sunsets or wildlife encounters. Others make a career bringing the wonders of nature to a wider audience, whether it’s for personal financial gain or to raise awareness for conservation issues, or (like me) both. Regardless of if you’re a professional or amateur photographer, this guide will help you sharpen your skills.
(DON’T BE THAT PERSON)
I mention this part in most photography articles I write because it’s extremely important: Please practice ethical photography. This means 1.) Leave no trace behind. Pack out everything you brought in. I can’t tell you how many beautiful popular places I’ve been to and seen trash scattered around. Let’s be an example. 2.) Do not disturb the wildlife we are out there to photograph. Calling, baiting, chasing, or harassing wildlife in any way, regardless of the photograph you captured, is wrong. Ok, now that is out of the way. Let’s have some fun exploring everything that is nature photography.
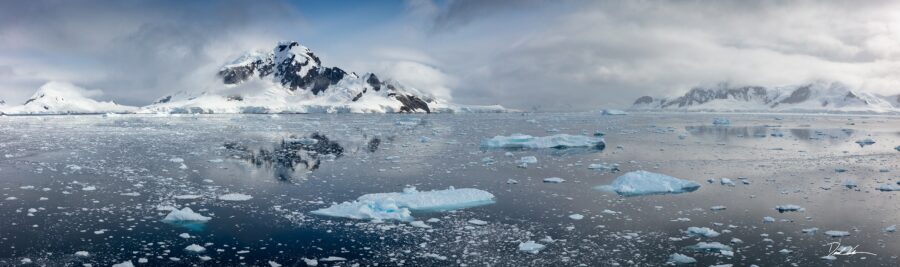
HOW TO PHOTOGRAPH GREAT IMAGES OF NATURE

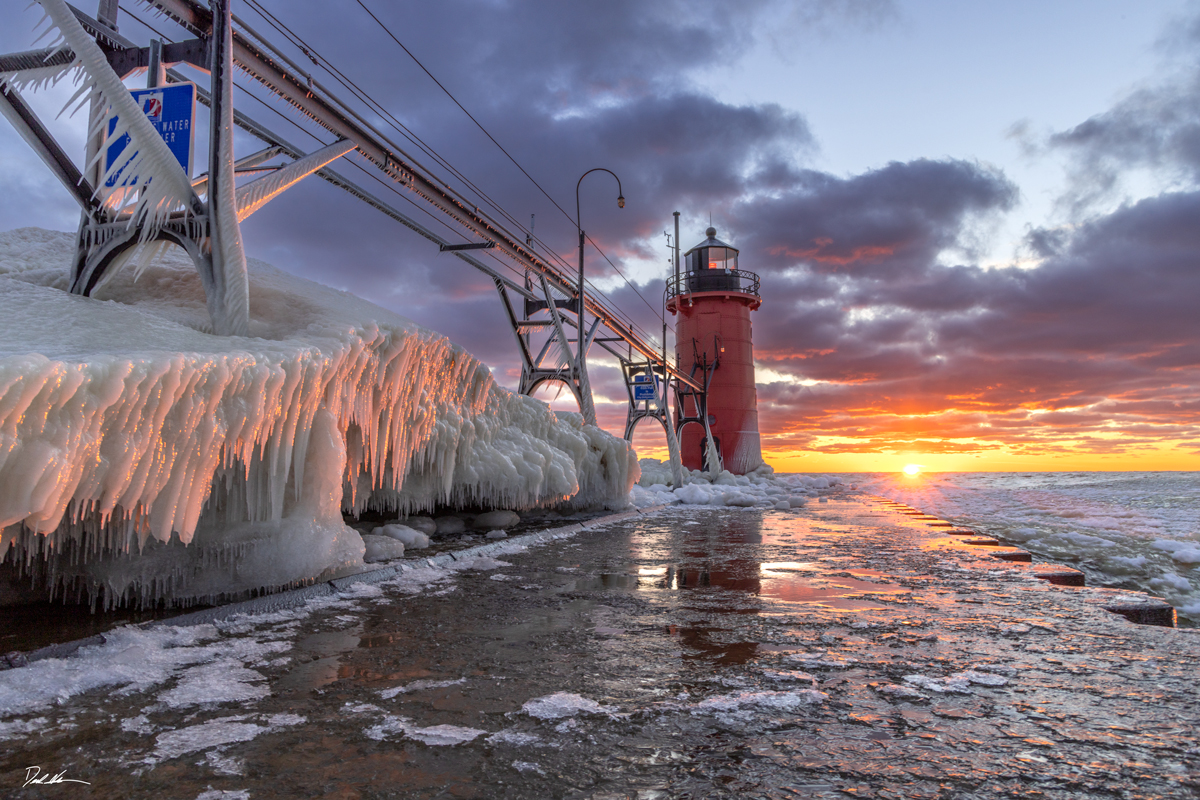
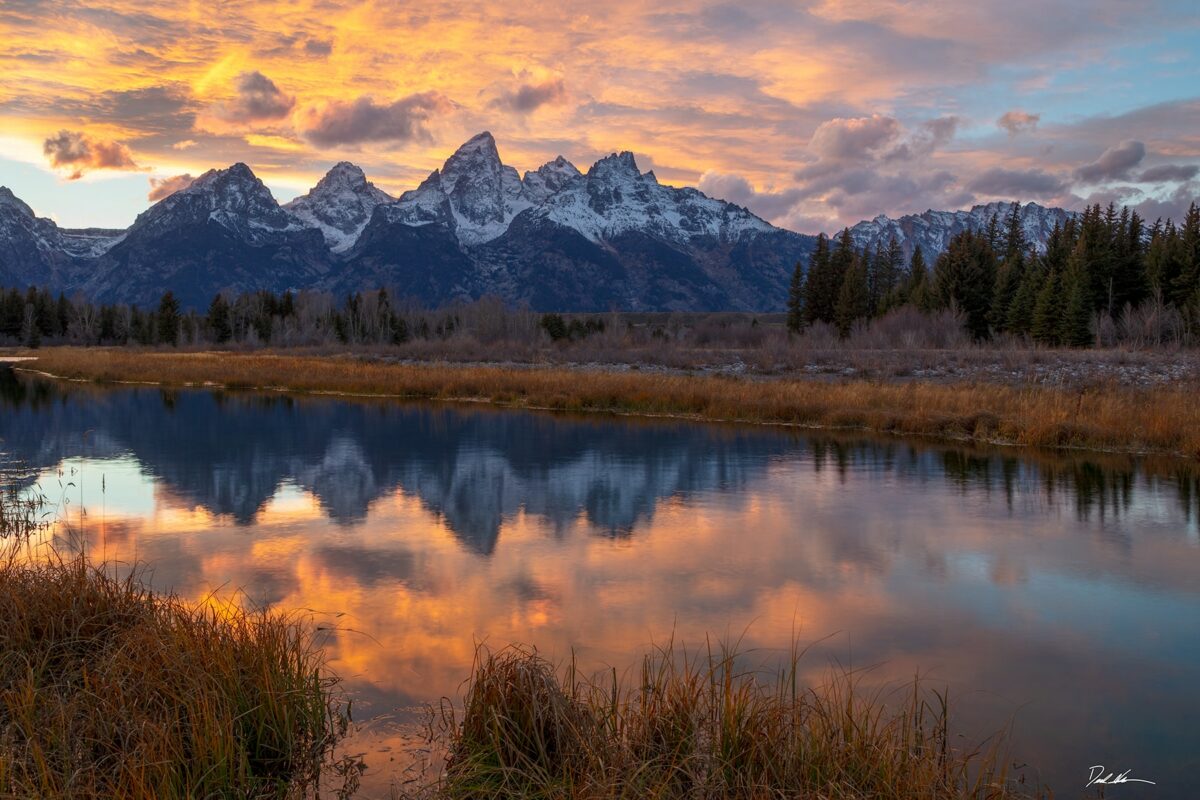
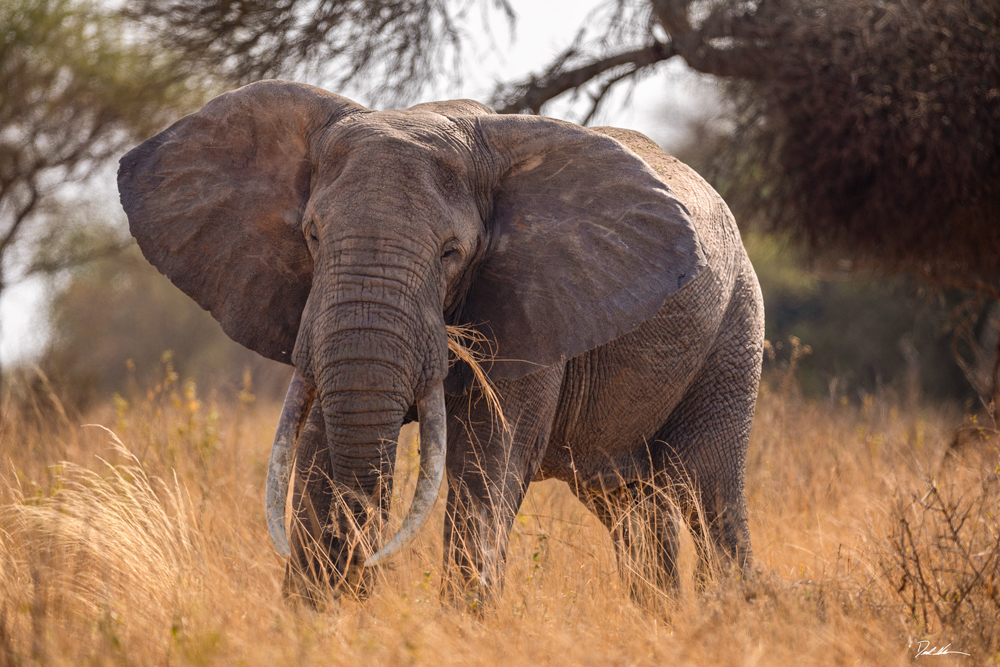
(Limited Edition Luxury Fine Art Print of 100 – Derek Nielsen Photography)
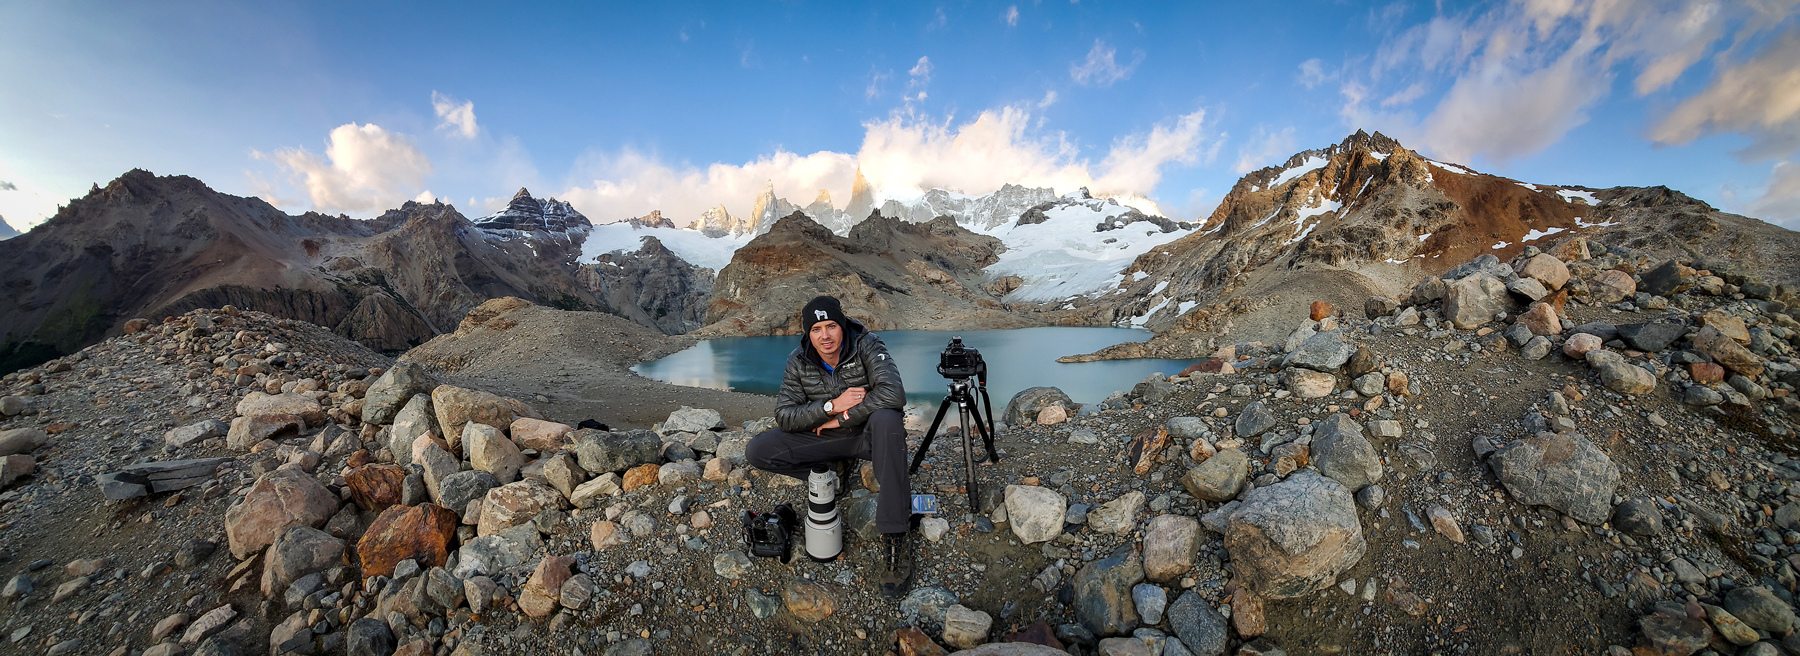
Aside from being able to capture beautiful images, did you know that being outdoors is actually REALLY beneficial to your health? This part of nature photography is often overlooked. You have chosen a hobby or career that may help you live a longer, happier life. So many of us get caught up in the capture and forget to look around. Breath. Take it all in. Savor the experience. And, of course, bring home some memorable images.
THE GEAR (THE BEST CAMERA IS THE ONE YOU KNOW HOW TO USE)
BEST CAMERA FOR NATURE PHOTOGRAPHY.
Today’s ever-changing camera market can leave your head spinning on which one to choose. As a photographer, I often get asked, “What’s a good camera for me to buy?” My answer is often, “It depends.” I know. Probably not what the person was hoping for, but the truth of it is cameras have a wide range of possibilities and strengths. The first thing you should be seriously thinking about is what you want to photograph. Some cameras are better suited for different subjects. For instance, one of the best cameras for low-light star photography in Canon’s lineup is the Canon 6D Mark ii. It has many of the important qualities you look for when shooting night photography but isn’t the most expensive.
Don’t let price be your guide for quality. The second thing you should be thinking about is your budget. Cameras range from a few hundred dollars to over $50,000. Buy a camera you won’t be overwhelmed trying to use while still being able to afford a decent lens to attach to it. Early in my career, I asked one of the world’s most famous fashion photographers, Victor Skrebneski, what camera I should bring on my 6-month trip to South America. I was shocked by his answer. He didn’t say some expensive, high-end camera. He reached into his pocket and pulled out a cheap digital camera, and said, “The one you know how to use.”
THE IMPORTANCE OF A TRIPOD IN NATURE PHOTOGRAPHY.

To become a great nature photographer, you will most likely be shooting in low-light conditions like early morning. It’s not impossible to build a career photographing bright middle-of-the-day photos. However, if you want to capture those saturated colors at sunrise and sunset, you should invest in a sturdy tripod. I shoot with Really Right Stuff. Yes, their stuff is expensive. The ease of use, durability, lightweight, and stability are incredible.
These qualities are so important when choosing a tripod. Camera gear can get heavy, so you don’t want to lug around a heavy tripod too. On the flip side, you don’t want something flimsy that will shake or fall over in a gentle breeze. When photographing with a large telephoto lens out in nature, you will be glad to have a tripod to pivot on. Hand-holding a 600mm lens to get sharp images can be done but trust me, it gets tiring. A tripod is as important as a good lens when it comes to night photography.
Anytime you use a slow shutter speed you will need a tripod unless you are purposefully trying to achieve a blurry photograph.
THE BEST CAMERA ACCESSORIES FOR NATURE PHOTOGRAPHY.

Ok, now that you have a reliable camera you know how to use, a favorite lens or two, and a sturdy lightweight tripod. Here are a few accessories that come in handy that are in the “nice to have” category.
Battery grip – having your only battery die on you after traveling out to some stunning location can be infuriating. Get a few backup batteries for your camera and a battery grip. They hold two batteries for twice the shooting life. I always carry an extra charged battery in the inside pocket of my jacket to keep it from dying when in cold temperatures. Cold can suck the life out of your battery quickly.
L Bracket – An L bracket was a genius invention for a tripod mount. They attach to the base of your camera and let you quickly transition between horizontal and vertical shots.
Remote or cable release – When you reach that breathtaking location and now want to capture the perfect image. The last thing you want to do is have the camera shake and ruin your sharpness. A remote or cable release will allow you to capture your perfect image without disturbing the camera in any way. If you don’t have one, you can always set a timer, but that gets old fast. A lot of cameras only allow a 30-second exposure, so some sort of cable release will be needed for exposures longer than 30 seconds.
Lens cleaning cloth – A few things are less annoying than coming home to a memory card full of beautiful images to find out you had a dirty lens. Seems like common sense but clean your lens and clean it often while out in the field. Dust and moisture attract like magnets to the front of your lens. If you’ve ever photographed at the base of a large waterfall, you’ll wish you had a pocket full of cleaning clothes.
Camera bag – A good camera bag is often taken for granted. It will not only protect your expensive gear but also carry all those great cameras, lenses, and accessories in one place is priceless. If you plan on traveling for nature photography on planes, buses, or trains, look for a bag that will double as a carry-on. I usually store my laptop, tablet, and all my expensive gear inside. This way, it’s with me and unlikely to get lost or stolen.
THE DETAILS (DON’T LET THEM OVERWHELM YOU)

THE BEST CAMERA SETTINGS FOR LANDSCAPE NATURE PHOTOGRAPHY.
This can be a heavily disputed topic. Most professional landscape photographers will tell you to shoot using a low ISO (100-400) to preserve as much detail as possible. In most situations, this is absolutely valid. As you read on in this guide, you will see the only thing black and white in photography is black and white photography. Everything else is left to the creative individual. What you, as a photographer, need to start thinking about is – How will you achieve your desired outcome using all the camera settings?
If I were to go photograph a sunrise in a mountain meadow with a slight breeze. The breeze may blow the grasses around, causing the foreground of my image to seem blurry. This may be an interesting effect, but I want the whole image to be sharp. A low ISO and long shutter speed won’t work for the effect I’m looking for in this light condition. In that case, I would up my ISO (800 or higher) and shutter speed to attempt to freeze the motion if I wanted a razor-sharp image from front to back. I will dive deeper into all these settings, why you may use them, and how they can help you achieve the end result you are looking for in the later sections of this guide. If you’re just starting out, don’t get hung up on all the details. Work on composition.
THE BEST CAMERA SETTINGS FOR WILDLIFE NATURE PHOTOGRAPHY.

As with the above section, there is no perfect setting. With wildlife, though, you have to be a little faster in making a decision because they could be gone in the blink of an eye. There are a few camera settings I wish I learned early in my career that would have saved me a lot of heartache from missing shots. No one camera setting fits all shots, but a few pro hacks can get you a long way.
Shutter speed between 1/1000 to 1/2000 of a second – Animals move. No surprise there. Capturing them while moving and still getting sharp images can be very challenging. Shutter speeds in this range, depending on the speed of movement, will freeze your subject. This will give you razor-sharp images in almost any condition.
ISO at 800 – This is a pretty solid ISO setting where you can get clean images with little noise. There are always reasons to go up or down from here, but this is a pretty good place to start.
Use AI Servo focus mode – AI Servo continuously tracks moving objects and keeps them in focus. Imagine a horse running toward you in a field. Lock onto the subject by pressing your shutter button halfway down. When you’re ready, fully compress the shutter, and your horse should be in perfect focus.
Turn the beep off in your camera – This seems obvious, but I have been around photographers in the wild who haven’t. Save yourself some nasty looks from wildlife and other photographers by turning off the beep on your camera.
Burst Mode – This setting allows you to take a rapid succession of photographs of a fast-moving subject like a race car or a running animal. This setting is a must while on safari, where the action happens quickly.
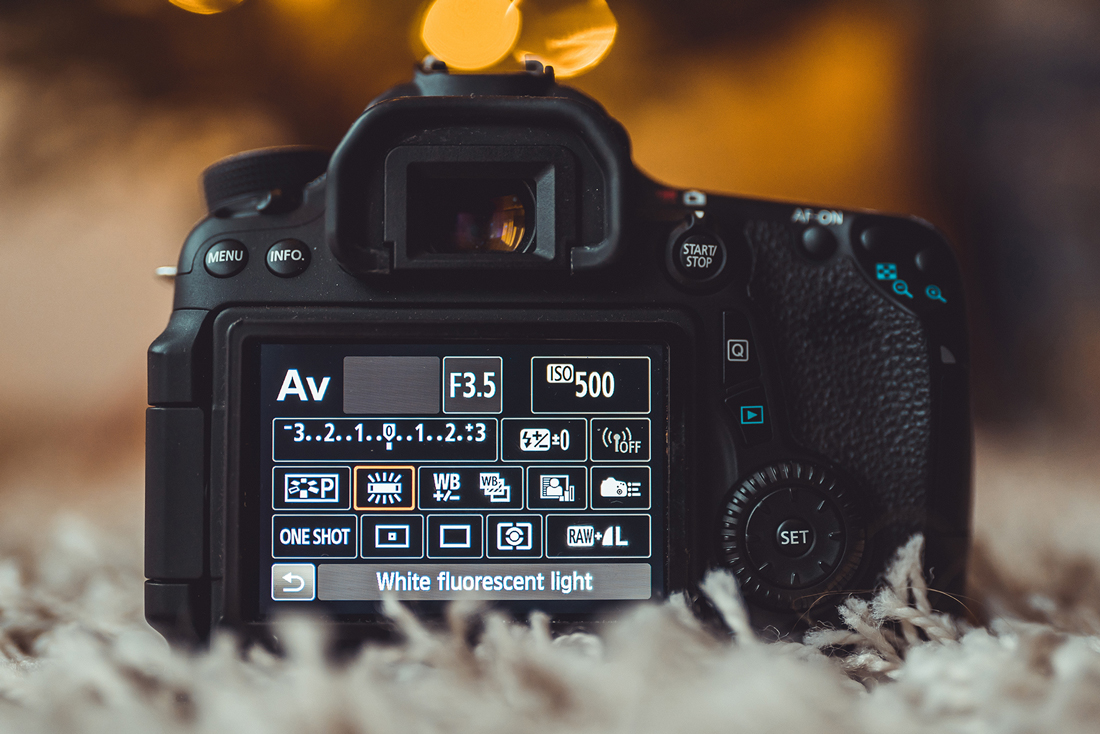
Aperture Priority Mode (AV)
Aperture Priority (AV) mode – If you’re uncomfortable shooting in manual or just want to do less thinking, this is your setting. In Aperture Priority mode, you pick the desired depth of field, and the camera chooses the correct shutter speed to match.
Shutter Priority Mode (TV)
This is a commonly used setting and one I often use as a professional photographer. So many of my subjects need to be razor-sharp. Switching to Shutter Priority Mode and letting the camera pick the correct aperture gives the best results in certain settings.
Manual Mode (M)
Manual mode gives the photographer complete control over the exposure. Beginner photographers looking to take their photography to the next level should pay close attention to how adjusting each component of exposure affects the final image. A good starting point is to set the camera on a tripod. Take a photo in manual. Adjust only the shutter speed by one click. Then retake the photo. See how each plays a role in exposure and composition.
RAW VS. JPEG WHICH ONE TO CHOOSE FOR NATURE PHOTOGRAPHY?

One of the most important decisions to initially make is whether to shoot in RAW or jpeg. Anyone serious about taking landscape photos should be shooting in RAW. The main reason is the amount of detail a RAW file holds. You will get more out of your RAW image. RAW images will eat up more memory on your memory cards, are often slower, and require special software to view. Jpegs are fast, smaller, and often appear prettier right out of the camera if taken correctly.
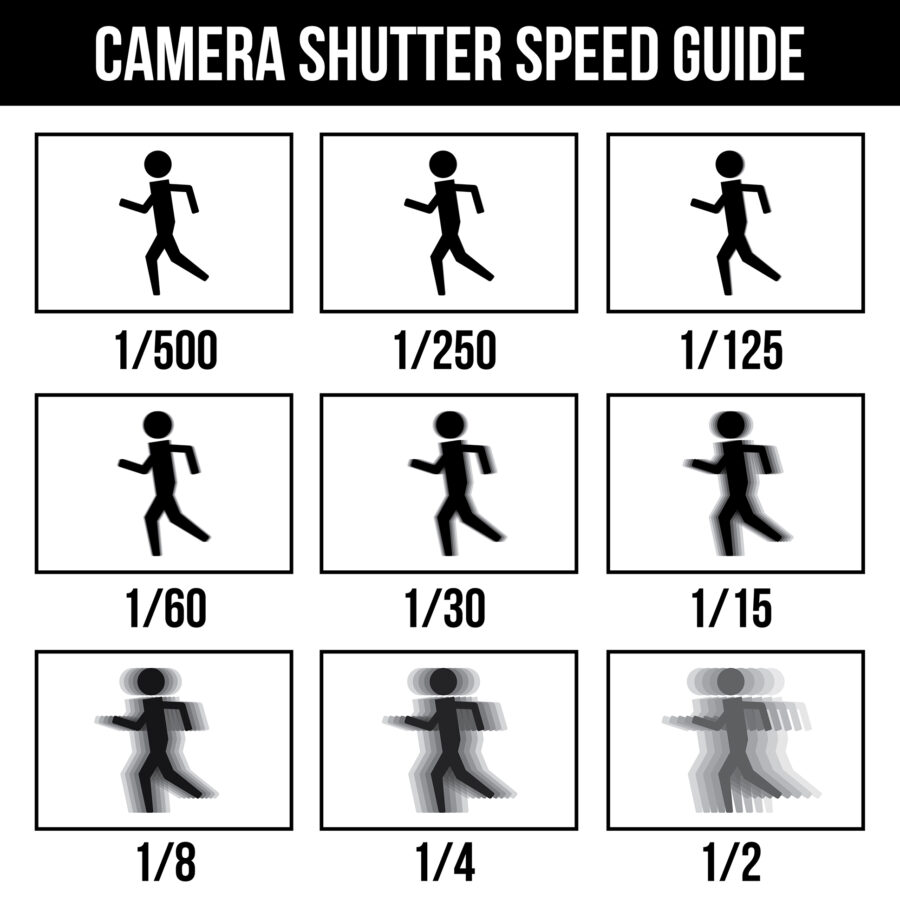
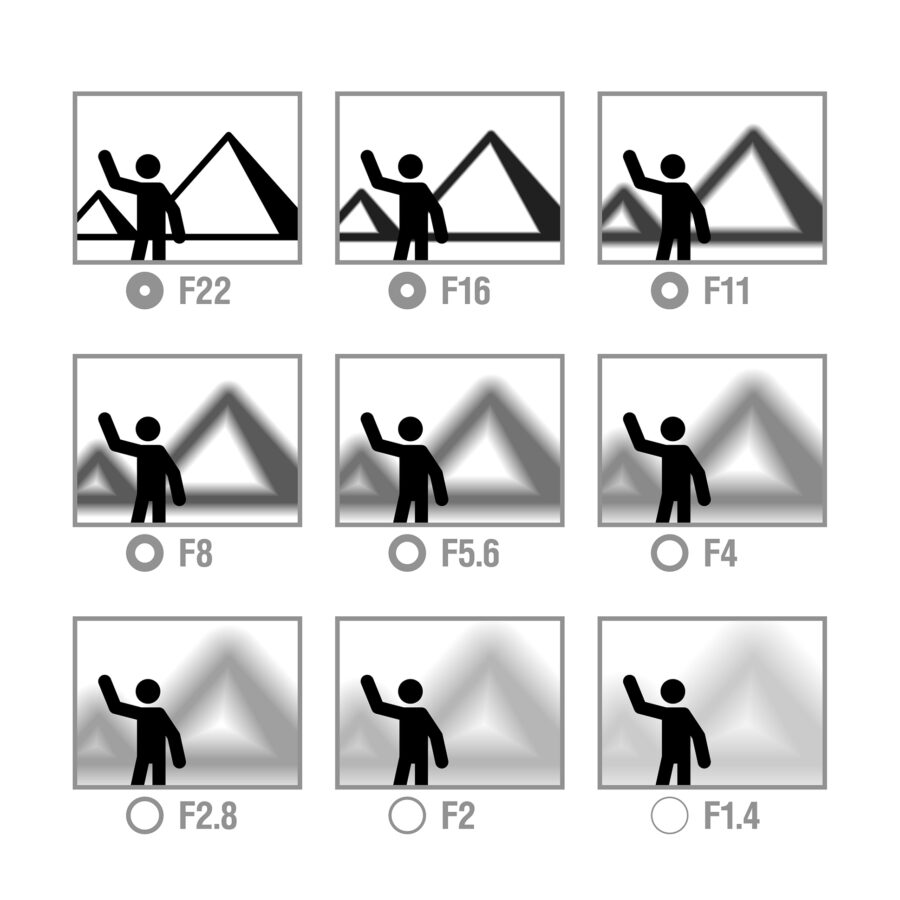
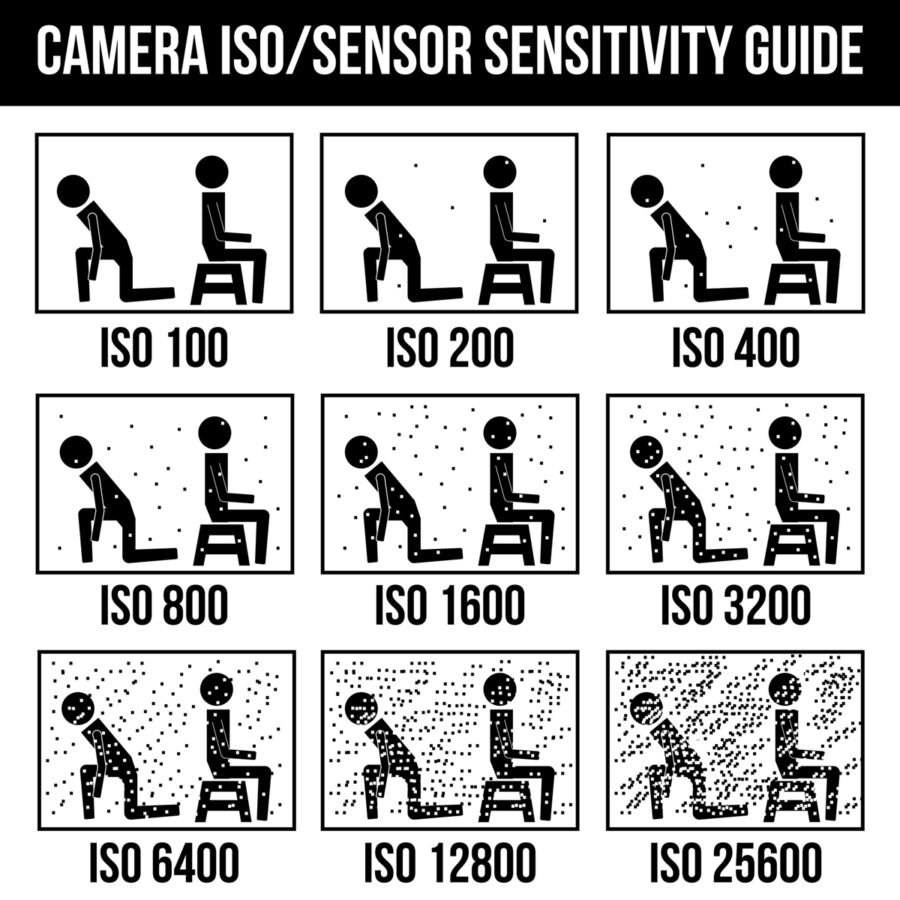
UNDERSTANDING THE EXPOSURE TRIANGLE.
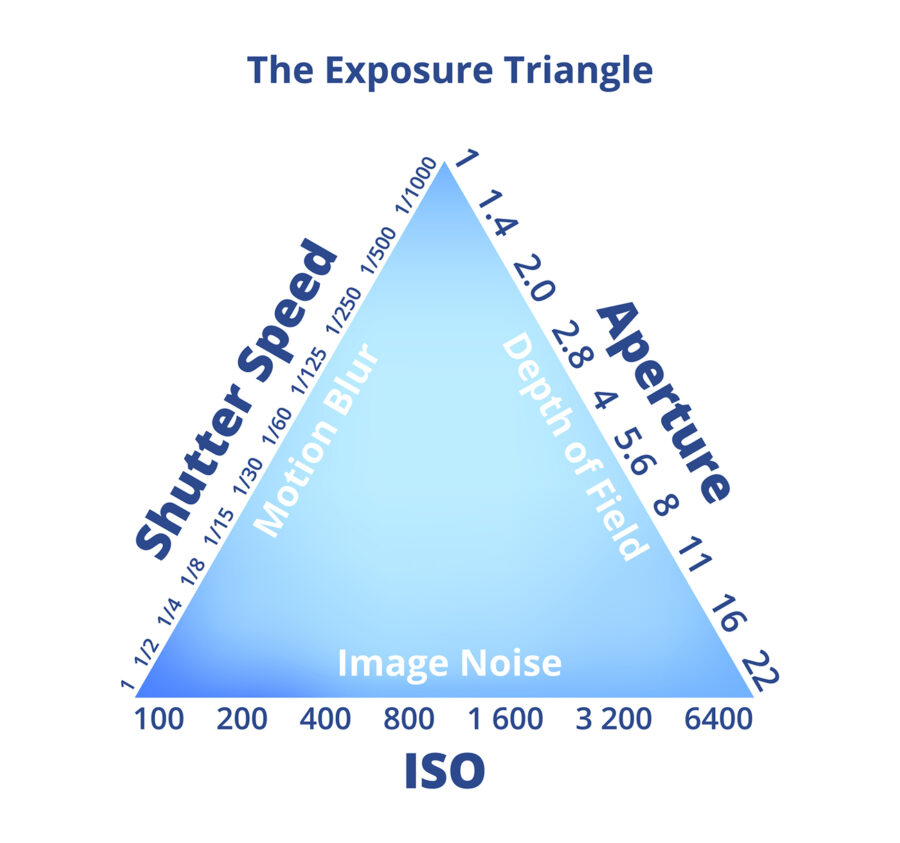
This can seem overwhelming and really isn’t anything you need to overthink. I am going to briefly explain each just so you get the basics. I’ll add images because if you are a photographer, chances are you are a visual learner like me.
Shutter Speed – Shutter speed is simply the amount of time the shutter is open, exposing the camera’s sensor to light. A very fast shutter speed freezes motion (1/1000sec.) A long shutter speed (1/2 second or more), depending on the motion of the scene, creates blur. A shutter speed of 1-2 seconds can turn a choppy lake into glass.
Aperture – This is simply how wide your lens iris is when taking a photo. A wide aperture (lower f/number) allows a lot of light in. This also creates the background of your image to blur, creating a narrow depth of field. Wide apertures are often used in portrait photography to isolate the subject from a noisy background (bottom right in the picture below). A narrow aperture (higher f/number) is used to bring everything in the scene into focus, creating a large depth of field. Landscape photographers use this to draw our eye into the image throughout the entire scene.
ISO – The last part of the exposure triangle is ISO. This was expressed as film speed for those who still remember those days. I typically start with the first two and adjust my ISO last. I start it at 100-400, depending on the time of day and light. Then, if I need to go higher, I will. In the early days of digital photography, ISO noise was a much bigger problem. Now, cameras are so good at performing at higher ISOs, and the software in post-production can be equally as impressive in removing noise. There is no point in missing a shot over the fear of noise. Go higher if you need it.
HOW TO CREATE THE PERFECT EXPOSURE FOR NATURE PHOTOGRAPHY.
(Limited Edition Luxury Fine Art Print of 6 – Derek Nielsen Photography)
Getting the correct exposure is not nearly as important as it used to be. Today’s technology allows us to play with exposure in post-processing in ways Ansel Adams only dreamed of. It’s still important to understand exposure. How shutter speed, aperture, and ISO all work together to form a perfect exposure. A “perfect” exposure keeps the details in the highlights and in the shadows of an image. In post-processing bringing out the details of shadows can be easy, but saving lost details in the highlights can be impossible. Understanding your histogram will help.
UNDERSTANDING HISTOGRAMS FOR NATURE PHOTOGRAPHY.

You don’t have to shoot using a histogram, but it can act as a great indicator of how your final image will turn out. What you see through the viewfinder or display on the back of your camera may be misleading to what the camera is seeing. The histogram tells you exactly this. When your curve is shifted to the left, the image will be underexposed. To the right, overexposed. What you want is a histogram with a balanced middle portion and very little, if anything, at all, along with the extremes.
PHOTOGRAPHING NATURE IN LIVE VIEW.

Live view can be a great tool to use when working out your composition and exposure. Live view can give you instant feedback if your camera settings are correct. When photographing in low-light conditions, the live view allows you to adjust your camera settings quickly while keeping the composition in mind. Some cameras fire more frames per second in live view vs. standard view. Canon’s 1D X Mark iii shoots 16fps through the viewfinder vs. 20fps in live view. Being that most LCD screens are backlit, the image may appear brighter on the LCD screen than on the final product. Just like a histogram, live view is meant to be another tool for information leading to a great photo.
HOW THE RULE OF THIRDS AND GOLDEN RATIO HELP COMPOSITION.

The rule of thirds is a guideline for composition. It is a rule, not a law. The rule of thirds divides the visual space into 9 equal parts with 2 horizontal and 2 vertical lines. Where these lines intersect is where important compositional objects should be placed. As you see here, the musician is located close to one intersection and where the road meets the mountain at the other.

The golden ratio was studied in great detail by the ancient Greeks. Their fascination stemmed from its frequent appearance in geometry. Not to get over-complicated, it’s a mathematical ratio of 1.618 to 1. If you look at the image above, you will see a large exterior rectangle. The longest center line splits the shape into two unequal sides. If you do this again and again and again, you will see the rectangle begin to form a tiny focus point. Now if you draw circular arcs from opposite corners of the square portions, you will end up with a spiral. This compositional technique is hard to master, but if you place your subjects along the spiral, you may find your images have more interest in them.
USING NEGATIVE SPACE TO ENHANCE COMPOSITION.

Negative space is the unoccupied space surrounding the main subject of your composition. It can be anything. A blue sky, a deep dark ocean like the one shown above, and space on a wall with no distractions. The positive space is where the subject you’re trying to highlight resides. Other factors, such as leading lines or the previous rules mentioned, can assist the negative space in drawing the viewer in. Try using negative space in your next composition. Not all scenes will have or deserve it, but it’s an additional tool to have in your thinking when composing shots.
HOW FOREGROUND, MID-GROUND, AND BACKGROUND AFFECT NATURE PHOTOGRAPHY.
This is one of the most important topics when it comes to composition. Normally, I like to start with this when talking about composition, but I decided to end with it because I hope it stays with you. In both landscape and wildlife photography, these three aspects of composition can greatly impact your viewer’s attention. Foreground – a strong foreground allows the viewer to step into the image. Midground – this is the easy transition between the foreground and background. Oftentimes the midground brings harmony to the total image. Background – This is the final resting place of the viewer’s eyes. They have walked through your image and now have reached the end.
A helpful trick is to add an element to the background, such as dark space or negative space, that pushes the viewer back into your photo instead of letting the eye wander off. People often like to have all of these elements in razor-sharp focus. Many people create composite images called Focus Stacking to achieve this. The alternative (as shown above in image #2) is to keep the main subject of the image in razor-sharp focus but blur the foreground and background enough to give it an environment portrait while keeping the subject most important.
PANORAMICS FOR NATURE PHOTOGRAPHY.
Panoramic photography has gained much popularity over the years because of photographers like Peter Lik or Tom Mangelsen. Panoramics themselves have a different way of telling a story. They can bring a viewer deeper into the scene where other formats fall short. Panoramics can be tricky. A few things to keep in mind when shooting panoramas are:
1. Use a sturdy, balanced tripod. 2. Lock your ISO and white balance so the light doesn’t change from image to image based on what the camera is pointing at. 3. Setting a focal length is also important. If your camera jumps to a different subject in the scene, it may blur parts of the image you previously had in focus. 4. Finally, try shooting your panoramas with vertical orientation on the camera. You will gather more of the scene this way. A good rule of thumb is to overlap your previous image by ½ for the next. This way, you are gathering enough information for when you’re ready to stitch it for the final product without missing elements.
LONG EXPOSURE PHOTOGRAPHY.
Long exposures in photography are a lot of fun to play with. It can calm a raging river, and fast-moving water turns into glass or softens up passing clouds. It tells a story of motion, whereas a fast shutter speed freezes time. Three crucial ingredients for great long-exposure photography are A tripod, cable release or remote, and a neutral density filter. A tripod keeps your stationary objects sharp while allowing the motion to take form. Cable releases will prevent any unwanted camera shake from pressing on the camera to release the shutter. A variety of neutral-density filters will allow you to use longer shutter speeds without overexposing your image during the day.
BLACK AND WHITE NATURE PHOTOGRAPHY.
Black and white photography has a timeless feel to it. Details of texture emerge in the absence of color variation. I often switch to thinking about black-and-white compositions when the light becomes harsh and less attractive for color. There is no need to change any of your camera settings to shoot in black and white. Simply shoot in color, and in post-processing, remove the color.
One way to create a black-and-white image from a color one is to desaturate the image in the saturation menu. This often leaves the new photo feeling flat and dull. A better way is to convert the image to a smart object in the layers menu. Then select in the filters menu and select camera raw filter. Once inside, select the black and white option. Doing so will allow you to control your image in a less destructive way. You can now adjust the reds, blues, and other colors to achieve just the right look you’re going for in your final image.
HOW WEATHER HELPS NATURE PHOTOGRAPHY.

The weather just makes beautiful scenes even more gorgeous. There are few things sadder for a photographer than to travel days or weeks to a new destination only to have nothing but blue skies. Seems weird to say, but empty blue skies are not nearly as interesting as dramatic cloud-filled skies or an approaching storm. Besides checking the national weather websites, a great tool for any nature photographer to use is https://sunsetwx.com. I often use this the night before I head out to shoot a sunrise. This website gives you fairly accurate predictions about the strength of the sunrise in regard to color. Blue tones represent less interesting skies, while reds indicate what could be a gorgeous sunrise or sunset.
HOW TO USE THE LEADING LINES TECHNIQUE IN NATURE PHOTOGRAPHY.
Our eyes wander through an image picking up shapes, textures, and lines leading us to the desired subjects inside a photograph. They tend to come in the form of vertical, horizontal, diagonal, or converging lines. If you look at the photo above, you will see the use of horizontal, vertical, and diagonal lines. The horizontal lines are found in the horizon of the photograph where the forest meets the mountains and again (even though jagged) where the mountains meet the sky. A vertical line, the solid yellow lane line, takes you right to the center of the photograph. The diagonal lines lead the viewer from the foreground to the background found on the road. Try incorporating any of these leading lines into your next photograph and see where your eye takes you.
HOW TO CREATE ORIGINALITY IN NATURE PHOTOGRAPHY.
(Limited Edition Luxury Fine Art Print of 50 – Derek Nielsen Photography)
With the popularity of social media companies like Instagram and Facebook, many of our most beautiful locations have been photographed to exhaustion. Places like the Wanaka tree in New Zealand, Mesa Arch in Utah, the maple tree found in Portland, Oregon’s Japanese Garden, and Kanarraville Falls have been photographed millions of times. Some artists have made their whole careers photographing basically one of these places. Finding new compositions can be challenging.
A few simple ways to create unique compositions are 1. Travel to these places in the off-season. 2. Take an image from a different perspective. Go high or very low with your angle of composition. 3. Blaze your own trail. Not that images of the maple tree in Portland’s Japanese Garden aren’t beautiful, but at some point, people will look for something more.
HOW TO USE FILTERS IN NATURE PHOTOGRAPHY.

Filters aren’t just fun. They can really help make beautiful images. The most popular filters are Ultraviolet, Polarizing, Neutral Density, and Graduated Neutral Density filters. They are relatively inexpensive and can add a lot to your final image.
Ultraviolet or UV – these filters are basically used these days as protection for the front element of your lens in adverse conditions. I caution about leaving them on your lens all the time, though. If you are using a quality lens, the addition of another layer for light to travel through may decrease the sharpness of the image or cause excessive lens flares. Don’t cover a multi-thousand-dollar lens with a cheap filter.
Polarizing – polarizing filters are great for removing reflections and saturating an image. They work exactly as polarized eyeglasses work. The surface of water and leaves on a tree will lose that shiny look from the reflecting sun. Polarizers can help remove the haze from or darken a blue sky. A polarizing filter is attached to my landscape lens at all times.
Neutral Density – these filters reduce the amount of light that passes through your lens before it hits the sensor. They come in various levels of intensity. Some are subtle, reducing the light to just a half-stop or two. Others are strong, seeming nearly pitch black. They are often used to photograph waterfalls to achieve the softly flowing water effect.
Graduated Neutral Density – popular with landscape photographers, these filters transition from dark to light from one end to the other. The main purpose is to darken one portion of the scene while leaving the other unaffected. If you have ever photographed a sunrise or sunset, you will see the portion above the horizon is substantially brighter than your foreground. A graduated neutral density filter will blend this transition of light for you and help your exposure.
ISO AND NOISE IN NATURE PHOTOGRAPHY.

I know we covered this earlier, but I thought it would be helpful to go a little deeper before talking about night photography. Years ago, when you picked your film speed, you were locked into that decision until your roll was completely finished. The film is made with different levels of light sensitivity. The same scene photographed at 50-speed film will look different than at 1600-speed film.
ISO is the sensitivity of your camera’s sensor to light, set by the International Organization of Standardization. A “Low” ISO 100 absorbs less light and delivers less noise. A “High” ISO 6400 and up lets in more light creating more noise. For the sake of simplicity in this article, images shot at a low ISO will have a better quality to them. A bit of advice, though, don’t fall in love with an ISO setting because you want better quality. Different scenes call for different ISO settings. Imagine trying to photograph a moving animal in low light. You are better off using a higher ISO setting and adding in some noise than coming home to a memory card full of blurry photos. As annoying as noise can be, it can be fixed. Blurry photos, most likely not.
THE BEST TIME OF DAY TO DO NATURE PHOTOGRAPHY
Blue hour and golden hour are the most ideal times of day to do nature photography. The soft light and saturated colors make both of these perfect for shooting. Blue hour occurs as the sun is beginning to light up the sky but has not yet cleared the horizon. Golden hour occurs when the sun is crossing the horizon casting warm light across the landscape.
PHOTOGRAPHING NATURE AT NIGHT.

Photographing nature at night can be challenging. You have to bring a different level of creativity to it. Often you can’t just look through the camera and press the shutter button. Typically you have to compose the scene blind. Test your settings. Make the appropriate adjustments to the aperture, shutter speed, ISO, and composition, then reshoot.
Landscapes are generally easier to photograph in the dark because they don’t move. In wildlife, you will need an external flash or flashlights to paint light on your subject. A sturdy tripod is a huge help, but be creative if you don’t have one. I took the photograph above, hand-held, using a headlamp to shine on the Western Tarsier in Borneo. Cameras with large sensors, such as the Nikon Z6 offer incredible images at higher ISOs. Buy a lens with a larger aperture around f/2.8. The more light you can let in, the better. A reliable, inexpensive choice for many night photographers is the Irix 15mm f/2.4 for star photography.
HOW TO PHOTOGRAPH WILDLIFE IN NATURE.
Research, timing, patience, and sometimes luck. Half the fun of photographing wildlife in nature is their often unpredictable nature. The best thing you can do to help get that great shot is research the animal you are hoping to photograph. Learn about their sleep patterns. When do they feed? What do they feed on? What habitat do they prefer? A solid foundation of understanding the animal will certainly improve your chances of seeing it. Timing is very important when photographing animals. They move quickly. You may only have a split second to capture the shot you came for.
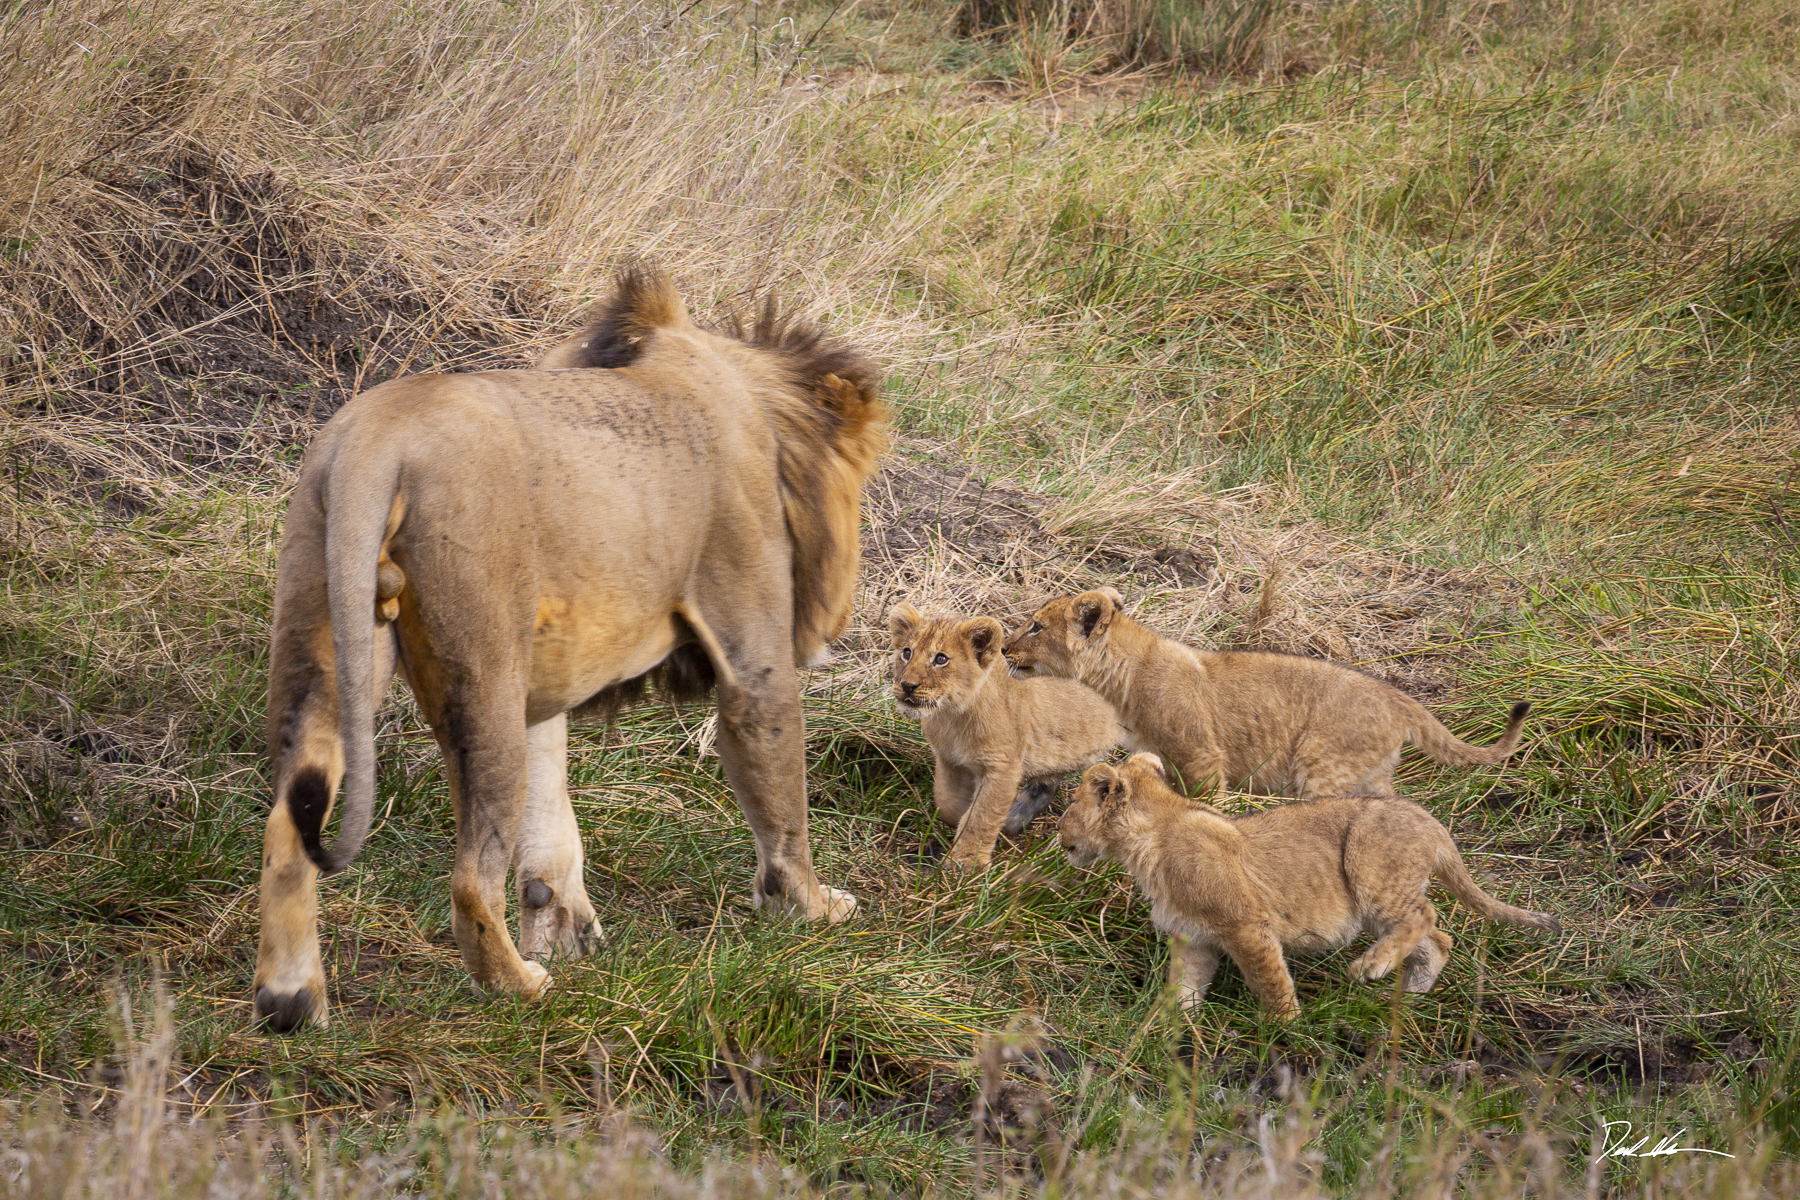
Set up your camera ahead of time to your expected settings, so you’re not fumbling around when it’s time to capture. Be patient. I once arrived at a pride of lions sleeping in the hot African sun next to a half-eaten wildebeest. A few other photographers drove up, saw they were sleeping, and moved on. I waited for hours. Eventually, they got up, socialized, the cubs played, and this whole family dynamic unfolded right in front of me. I was the only photographer around for miles and left with a memory card full of great images. Luck. Sometimes you can do everything right, and luck just isn’t on your side that day. A bad day out in nature doing photography is better than most days stuck in an office.
WHY PATIENCE IS SO IMPORTANT IN NATURE PHOTOGRAPHY.
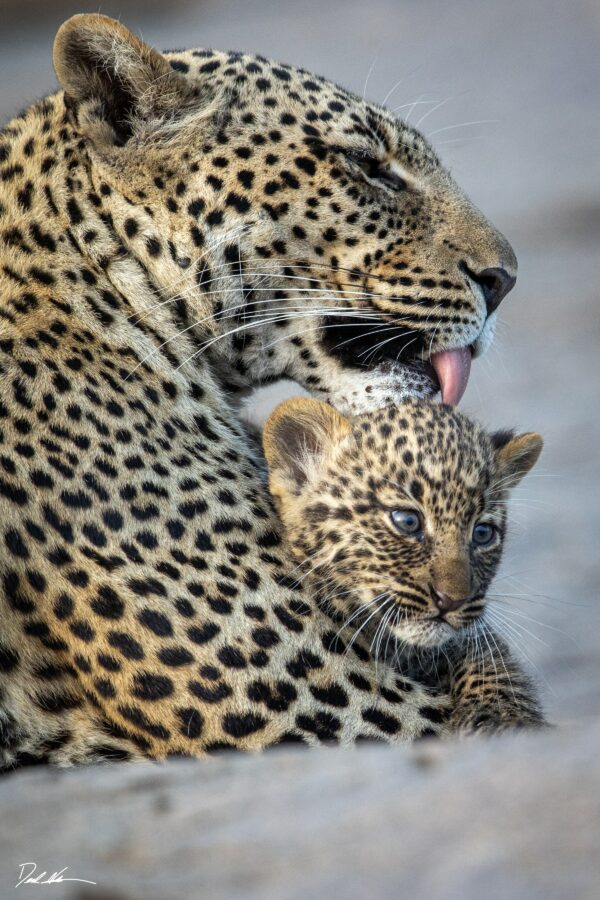
Patience is one of the most underrated qualities of great photographers. Some photographers spend days or weeks in a blind hidden in some remote location just to get a few shots of an endangered species. Not all photo shoots require such lengths. When working with wild animals, though, a little bit of patience can go a long way. The photo above was captured after several hours of just watching these guys sleep. Finally, they awoke and wanted to attack Dad. Please do not disturb an animal, though, just to get a shot of it standing. Be an observer.
PRACTICE PHOTOGRAPHY ON YOUR PETS.

One of the best ways to sharpen your skills as a nature photographer is to practice all you are learning on your pets. Seriously. It’s a blast. Take this low-pressure opportunity to work out all the camera settings. Learn how to track your dog chasing a ball. Play with the aperture to get that epic portrait of the cat who rules your house. Imagine your horse is a wild zebra, and capture it in frozen motion while running. Before every trip, I take, my dog and I go out to the fields by my house, and I refresh on all the basics. Practice makes progress.
WHAT MAKES A MEMORABLE OR AWARD-WINNING WILDLIFE PHOTO?
(Limited Edition Luxury Fine Art Print Of 100 – Derek Nielsen Photography)
So many things can lead to a memorable or award-winning photograph. We all love striking images with a great composition that tells a story. So do judges. Images that grab our attention and don’t let go. Creativity. Is it just another photo of a penguin or one with a different perspective never seen before? Technical excellence. Take everything we have discussed regarding composition, leading lines, golden ratio, sharpness, and lighting, and tell a story with it. Use foreground, middle, and background elements to walk your audience through the image. Being a pretty image may sell a few prints, but judges often notice that and then dive deeper.
HOW TO TAKE STRONG PORTRAITS OF ANIMALS.
Limited Edition Luxury Fine Art Print of 6 – Derek Nielsen Photography)
In wildlife photography, there are two major categories. The first is animal portraits (like the one shown above), and the second is environmental portraiture. This is capturing the animal along with its surrounding environment. The former highlights the features of only the animal, while the latter features the animal in its natural habitat, telling a deeper story. When photographing animal portraits, the most important technique is to make sure the eye of the animal is in sharp focus. New cameras like the Canon R3 have the technology to not only find the eye but keep it in focus while the subject is moving. This is a game-changer for many bird photographers. Another important technique is to use an aperture that is in the f/2.8 to f/5.6 range. This will highlight the animal while blurring out the distracting elements of the background.
HOW TO TAKE STRONG IMAGES OF ANIMALS IN THEIR ENVIRONMENT.
(Limited Edition Luxury Fine Art Print of 100 – Derek Nielsen Photography)
Environmental portraiture is a fantastic way to tell a story deeper than just photographing a wild animal headshot. When you include the animals surrounding, it draws the viewer into the scene. Makes them feel like they are there. It takes them on an adventure or safari. It also validates the photograph was not taken at a zoo. The above image of a primate was taken in the jungles of Borneo but could easily have been taken in a zoo.
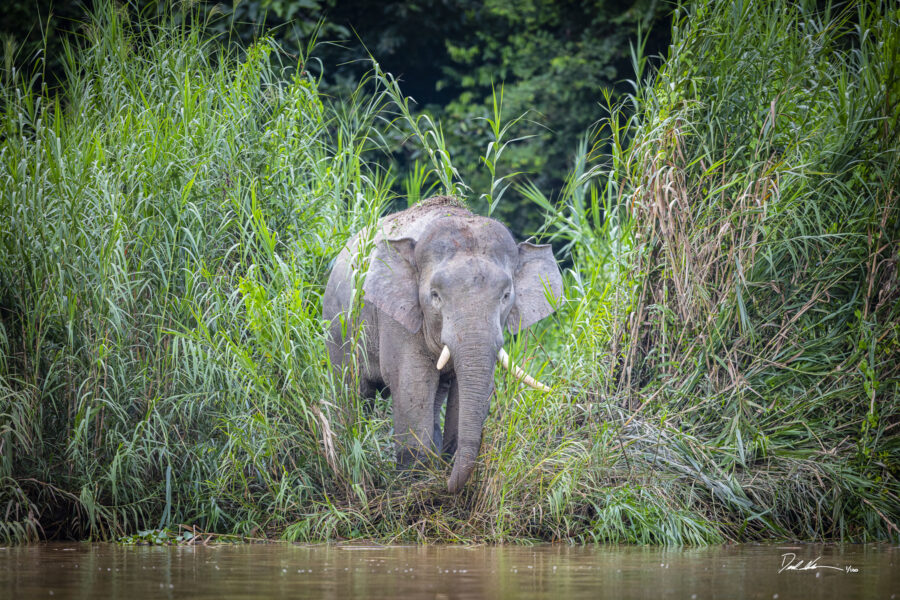
In other words, the surroundings give no indication the animal is, in fact, wild. When photographing environmental portraiture, use an aperture f/8 or above. This will provide a larger depth of field. This photo of an elephant uses the dense jungle and river to provide context to where it was taken.
What Is The Best Lens For Wildlife Photography?
There is no perfect answer for this, but a key thing to remember is to always photograph wildlife at a safe distance. Wildlife photos should be a representation of what the animal is doing in nature, not an interaction with it. I typically rent a 600mm lens when taking photographs of dangerous animals. This allows me to get incredible shots while keeping me and the animal safe. Ethical photography matters, and anyone willing to jeopardize the safety of an animal for a shot should switch careers.
BEST MEMORY CARDS FOR WILDLIFE NATURE PHOTOGRAPHY.

All memory cards are definitely not created equal. Besides the amount of data they can hold, there are a few other important things to know about memory cards.
Compatibility with your camera – before you go out and buy a bunch of expensive memory cards for your camera, you should see what kinds your camera accepts. As you can see from the picture above, there are many different kinds. The most common are mini SD, SD, CF, and CF Express.
Memory size – if you are going to be shooting with high-megapixel cameras or shooting 4-8k video, you will want a large memory card. I would recommend something 128GB and above. PRO TIP! Buy a few 128GB and change them after every shoot. They are cheaper. If you lose one or something happens to it, you don’t lose your entire trip.
Writing and Reading speed – WRITE speed refers to how fast the card can capture and transfer the information from your camera to the card. A card with a higher write speed can handle the new burst rates newer cameras can fire off. When the card can’t handle the amount of information coming in, buffering will occur. READ speed refers to the speed at which data can be transferred from one card to your computer or storage device. A new CF Express card has 1450 reads, and 450 writes. That’s fast.
Keys To Bird Photography
As with most wildlife shots, bird photography is best when taken at a low angle. This gives the viewer a window into their world. A Birds Eye perspective. Here are a few more keys to getting great shots of birds.
- Fast Shutter Speed – Birds move fast, so a shutter of 1/1000 or faster is recommended.
- Wide Open Aperture – Don’t let the forest distract from the main subject. Blur the background.
- Single-Servo Autofocus – This will lock onto your subject keeping it in focus for each shutter press.
- Eye Detect Autofocus – If your camera has the technology, let it do its job so you can focus on the composition.
PHOTOGRAPHY IS ABOUT BEING CREATIVE AND ENJOYING THE PROCESS
In the end, there are so many tools out there to help you become a better photographer or image creator. This guide was designed to simplify some of the key aspects of photography. Keep it simple and focus on the basics. Photography should be fun. Digest bits at a time. Don’t feel like you have to learn every little detail to become a great nature photographer. Remember, the composition is king. Be creative. Carry a smile. Get outside. If you remember those 4 key principles, you will have a long successful career as a nature photographer.
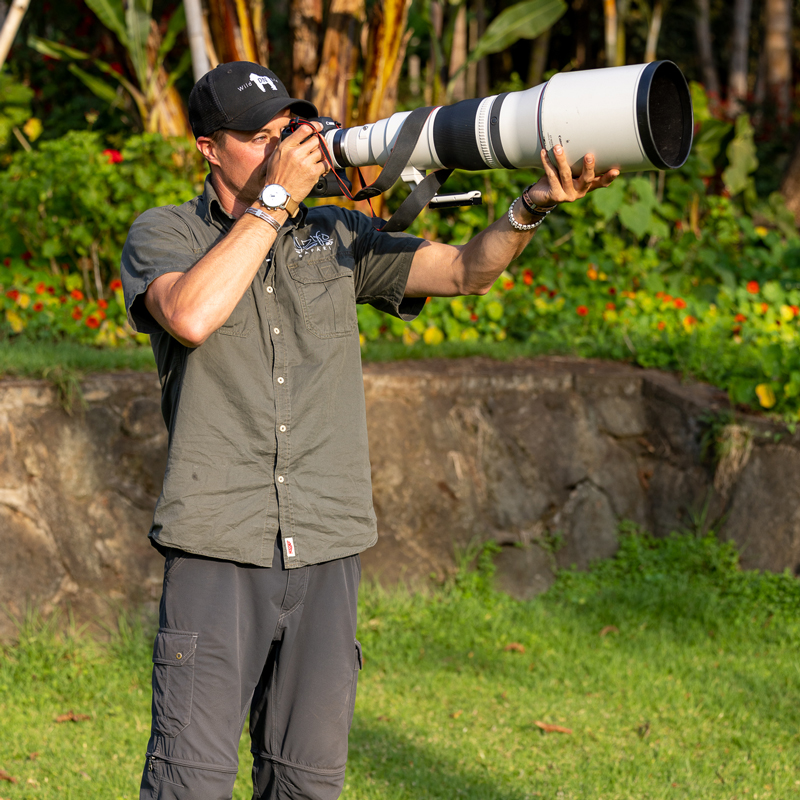
Hello! I'm Derek.
DEREK NIELSEN PHOTOGRAPHY RAISES AWARENESS ABOUT THE GLOBAL NEED FOR CONSERVATION THROUGH PHOTOGRAPHY AND DONATES UP TO 15% OF ALL SALES BACK TO ENVIRONMENTAL ORGANIZATIONS AROUND THE WORLD.