Photography mistakes, I feel like have made them all. Photography is one of the most rewarding creative pursuits out there. The ability to capture a fleeting moment, a stunning landscape, or the subtle expression on someone’s face is nothing short of magical. But if you’re starting out, it can also feel overwhelming. The good news? Every professional photographer, myself included, began as a beginner—making the same mistakes, fumbling through settings, and learning lessons the hard way.
The truth is, mistakes are part of the process. They’re how you grow. But if you can recognize the most common photography pitfalls early, you can skip years of frustration and fast-track your progress. In this article, I’ll walk you through 10 of the most common mistakes beginner photographers make—and how to fix them.
Mistake #1: Relying Too Much on Auto Mode
 Photographer Derek Nielsen high above the city of Chicago
The mistake:
Many beginners start by shooting in full Auto mode. While it’s convenient, Auto mode takes creative control away from you. The camera decides exposure, shutter speed, aperture, and ISO, leaving you with little say in how your image looks.
Why it matters:
You miss out on learning how to use light, motion, and depth of field to tell your story. Auto mode often yields flat, uninspiring images.
How to fix it:
-
Start with Aperture Priority (A/Av) or Shutter Priority (S/Tv) modes. These semi-automatic settings let you control one variable while the camera handles the rest.
-
Gradually work your way toward Manual mode, where you have full creative control.
-
Practice changing one setting at a time and notice how it affects your image.
???? Tip: Aperture controls depth of field (how blurry or sharp your background is), while shutter speed controls motion (freeze or blur).
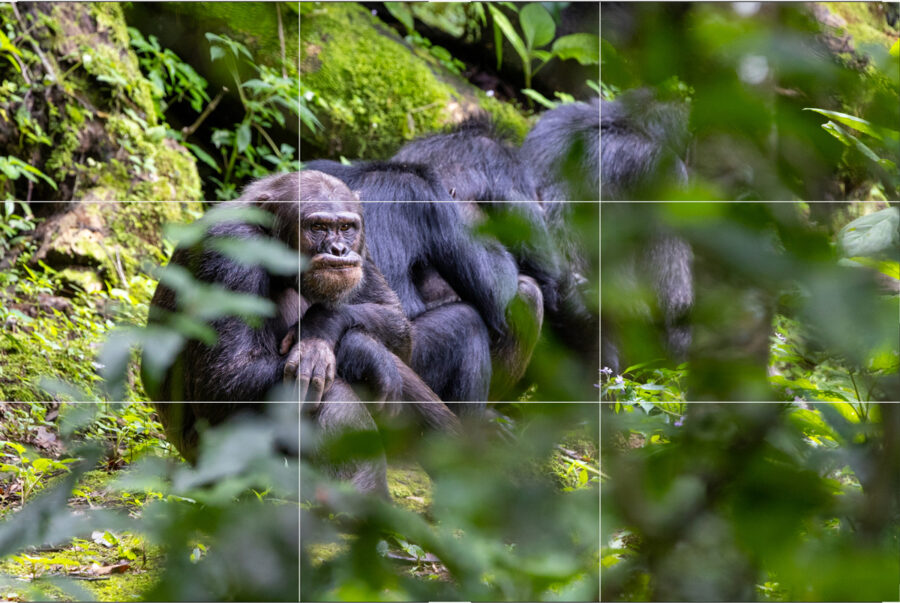
Mistake #2: Ignoring Composition
The mistake:
New photographers often place their subject directly in the center of the frame or crop awkwardly, without considering how elements in the scene guide the viewer’s eye.
Why it matters:
Composition is storytelling. Poor framing can make even technically perfect photos feel unbalanced or uninteresting.
How to fix it:
-
Learn the Rule of Thirds: Imagine a grid dividing your frame into nine equal parts. Place your subject along the lines or intersections for balance.
-
Use leading lines: Roads, rivers, fences, or shadows can guide the viewer’s eye.
-
Pay attention to negative space: Sometimes, leaving empty areas around your subject creates a stronger impact.
???? Tip: Study paintings and classic photography for composition inspiration.
Mistake #3: Overexposing or Underexposing Photos

The mistake:
Beginners often struggle with exposure, resulting in images that are either too bright (washed out) or too dark (lacking detail).
Why it matters:
Exposure determines how much light hits your camera sensor. Mastering it ensures your photos retain detail in both highlights and shadows.
How to fix it:
-
Learn the exposure triangle: aperture, shutter speed, and ISO.
-
Use your camera’s exposure compensation (+/-) to make quick adjustments.
-
Check your histogram instead of relying only on your LCD screen. It provides an accurate read of brightness levels.
???? Tip: Slight underexposure is often better than overexposure—you can recover shadows in editing, but blown highlights are gone forever.
Mistake #4: Forgetting About Light
 Positano Breeze – Limited Edition Fine Art Print Of 6 – Derek Nilsen Photography
The mistake:
Many beginners focus only on their subject, ignoring the quality and direction of light. Shooting at noon under harsh sunlight or indoors with poor lighting can make photos look flat or unflattering.
Why it matters:
Light is the most important element in photography. It shapes mood, texture, and depth.
How to fix it:
-
Shoot during golden hour (the hour after sunrise or before sunset) for soft, warm light.
-
Pay attention to the side light and backlight to create drama and dimension.
-
Indoors, position your subject near windows or use reflectors to bounce natural light.
???? Tip: Ask yourself before each shot: Where is the light coming from, and how is it shaping my subject?
Mistake #5: Not Holding the Camera Steady
The mistake:
Blurry photos often come from shaky hands or shooting at too slow a shutter speed without support.
Why it matters:
Sharpness is crucial. If your subject is moving or your hands shake, details are lost.
How to fix it:
-
Follow the 1/focal length rule: If your lens is 50mm, use at least 1/50 sec shutter speed. For 200mm, use 1/200 sec.
-
Stand with your elbows tucked and feet shoulder-width apart.
-
Use a tripod or monopod for low-light or long-exposure shots.
???? Tip: Image stabilization helps, but technique matters most.
Mistake #6: Overediting Photos
 Looking back at a highly over-edited photo from work early in my career.
The mistake:
Excited by editing software, many beginners crank up saturation, contrast, and sharpness, creating unnatural-looking images.
Why it matters:
Overediting can distract from your subject and date your work quickly. Collectors, galleries, and editors look for subtle, timeless processing.
How to fix it:
-
Use editing to enhance, not replace, good photography.
-
Focus on correcting exposure, white balance, and contrast before creative edits.
-
Step away from your edits and revisit them with fresh eyes.
???? Tip: If you notice the editing more than the image, you’ve gone too far.
Mistake #7: Neglecting the Background

The mistake:
New photographers often zero in on their subject but forget to check what’s behind them—resulting in distracting elements like poles, clutter, or bright patches.
Why it matters:
A busy or messy background can ruin an otherwise great photo.
How to fix it:
-
Move your feet! A slight shift in position can eliminate distractions.
-
Use a wider aperture (low f-stop) to blur backgrounds.
-
Look for clean backdrops, like skies, walls, or natural textures.
???? Tip: Train yourself to scan the entire frame before pressing the shutter.
Mistake #8: Not Backing Up Photos
 Paddling Paradise – Limited Edition Fine Art Print Of 6 – Derek Nielsen Photography
The mistake:
Beginners sometimes store all their images on one memory card or computer. If that device fails, years of work can vanish.
Why it matters:
Your photographs are your creative legacy. Losing them is heartbreaking and avoidable.
How to fix it:
-
Follow the 3-2-1 rule: 3 copies, 2 different media, 1 off-site backup (like the cloud).
-
Invest in reliable external hard drives.
-
Regularly back up after every shoot.
???? Tip: Cloud storage like Google Drive, Dropbox, or dedicated services (Backblaze, iDrive) adds extra security.
Mistake #9: Chasing Gear Instead of Skills

The mistake:
Many beginners believe the latest camera or lens will instantly make them better photographers. They upgrade constantly instead of mastering what they already have.
Why it matters:
The most expensive gear doesn’t guarantee great photos—your vision and technique matter more.
How to fix it:
-
Learn to maximize your current camera before upgrading.
-
Focus on storytelling, light, and composition.
-
Rent equipment before buying to see if it truly adds value.
???? Tip: A beginner with a basic camera but strong fundamentals will always outperform someone with pro gear and weak skills.
Mistake #10: Forgetting to Tell a Story
 Pacific Songs – Limited edition fine art print of 6 – Derek Nielsen Photography
The mistake:
New photographers sometimes focus too much on technical perfection and forget that photos are meant to communicate something.
Why it matters:
Great photography makes viewers feel something. Without a story, even technically flawless images can fall flat.
How to fix it:
-
Ask yourself: What emotion or story am I trying to capture here?
-
Use composition, light, and subject matter intentionally.
-
Develop projects or series around themes instead of random snapshots.
???? Tip: Your “why” is as important as your “how.”
Bringing It All Together
Becoming a better photographer isn’t about avoiding mistakes altogether—it’s about learning from them quickly. Each of these common pitfalls offers an opportunity to grow your skills and develop your creative voice.
If you’re serious about taking your photography to the next level, remember:
-
Learn the basics: Understand your camera, light, and composition.
-
Practice intentionally: Don’t just shoot—shoot with a purpose.
-
Be patient: Progress takes time, but every photo is a step forward.
Want to Go Deeper?

These lessons are just the beginning. If you’ve made some (or all) of these mistakes, you’re not alone—I’ve been there too. That’s exactly why I created my online photography course, designed to help beginners master the fundamentals while building their creative confidence.
Through guided lessons, real-world examples, and practical exercises, you’ll move beyond mistakes and start creating images that truly reflect your vision.
???? [Explore the course here – Learn with Derek Nielsen Photography]
Final Thoughts
Mistakes are not failures—they’re stepping stones. Every great photographer has taken blurry, overexposed, poorly composed images at some point. The difference is, they didn’t stop there.
By understanding the most common beginner mistakes and learning how to fix them, you’ll not only save yourself frustration but also accelerate your growth as a photographer.
So pick up your camera, embrace the process, and remember: the only real mistake is not taking the shot.

Hello! I'm Derek.
DEREK NIELSEN PHOTOGRAPHY RAISES AWARENESS ABOUT THE GLOBAL NEED FOR CONSERVATION THROUGH PHOTOGRAPHY AND DONATES UP TO 15% OF ALL SALES BACK TO ENVIRONMENTAL ORGANIZATIONS AROUND THE WORLD.